🏠 Atari Jaguar Developer Reference ▸ CD-ROM Subsystem ▸ Disc & Data Format
Disc & Data Format
How a Jaguar CD is laid out: sessions, tracks, frames, the Atari track headers/tailers, partition markers, the boot track, and Red Book audio.
Source: Jaguar CD-ROM developer manual (scanned), © Atari Corp. 1995, §1 (pp. 1–3) and §6 “Programming, Procedures, and Guidelines” (pp. 27–31, printed). See also Overview for the general CD-ROM background.
Physical units
| Unit | Size | Notes |
|---|---|---|
| Long | 4 bytes | CD data maintains long alignment only (not phrase) |
| Frame / Sector / Block | 588 longs = 2352 bytes | minimum addressable unit |
| Second | 75 frames (at 1×) | |
| Time code | mm:ss:ff |
minutes : seconds : frames, single-speed-relative, from disc start |
Addressing is by time code, not filename — there is no file system. See Overview → How it differs.
Session layout
The Jaguar CD format is raw data and multi-session:
- Session #0 is audio-only and must contain only standard Red Book audio (future product info, soundtrack music, etc.). No title with anything other than Red Book audio in Session #0 will be compatibility-encoded. Atari will likely claim the first track(s) for its own info. If you have no Red Book audio, ship at least one dummy track in Session #0.
- Session #1 begins developer code. Its first track is the boot track.
- The last track of the last session holds Atari authentication data (≈ 300K or less).
Use few sessions to minimize startup time (see Programming Guide → startup delay).
Mastering changes the layout
Atari masters your CD with a 2-second lead-in per track. Track start times in the TOC account for this and point at the start of your data, but all track start times shift during mastering — never rely on absolute timings or absolute track numbers. Determine the first track of Session #1 from the TOC and compute everything else as an offset from it.
You must add a dummy end track to your last session to reserve space for the compatibility-encoding data: 156,192 bytes of any dummy data (final size may vary with disc layout).
Example — what you submit:
| Session | Track | Contents |
|---|---|---|
| #0 | #1 | Developer Audio #1 |
| #2 | Developer Audio #2 | |
| #1 | #3 | Developer Boot Code |
| #4 | Developer Game Data #1 | |
| #5 | Developer Game Data #2 | |
| #2 | #6 | Developer Game Data #3 |
| #7 | Developer Game Data #4 | |
| #8 | Dummy End Track (required) |
What Atari returns after compatibility encoding:
| Session | Track | Contents |
|---|---|---|
| #0 | #1 | Atari Audio |
| … | (maybe more Atari audio tracks) | |
| #2 | Developer Audio #1 | |
| #3 | Developer Audio #2 | |
| #1 | #4 | Developer Boot Code |
| #5 | Developer Game Data #1 | |
| #6 | Developer Game Data #2 | |
| #2 | #7 | Developer Game Data #3 |
| #8 | Developer Game Data #4 | |
| #9 | Atari Compatibility Encoding Data |
Note the track numbers all shifted — hence the rule to work from the TOC, not hard-coded numbers.
Track headers and tailers
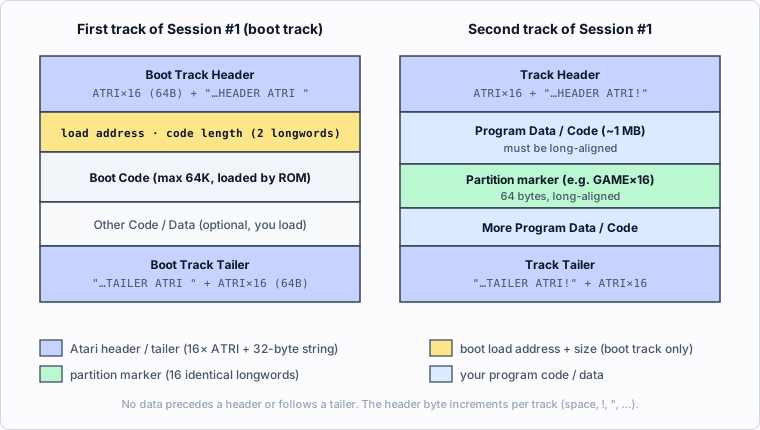
Every data track (Session #1 and above) must begin with an Atari header and end with an Atari tailer.
Header — 16 long-aligned repetitions of ATRI (64 bytes) followed by a
32-byte string:
ATRIATRIATRIATRIATRIATRIATRIATRI        <- 64 bytes: 16 × "ATRI"
ATRIATRIATRIATRIATRIATRIATRIATRI
ATARI APPROVED DATA HEADER ATRIx        <- exactly 32 bytes
Tailer — the 32-byte string followed by 16 repetitions of ATRI:
ATARI APPROVED DATA TAILER ATRIx        <- 32 bytes
ATRIATRIATRIATRIATRIATRIATRIATRI        <- 64 bytes: 16 × "ATRI"
ATRIATRIATRIATRIATRIATRIATRIATRI
The final byte x of both strings is a per-track sequence byte that increments
each track, starting at ASCII space:
| Track (in order) | Final byte |
|---|---|
| 1st data track (boot track) | space 0x20 |
| 2nd data track | ! 0x21 |
| 3rd data track | " 0x22 |
| … | … |
The tailer’s final byte matches the header’s for the same track. No data may precede a header or follow a tailer.
The boot track
The boot track has two extra Motorola (MSB-first) longwords immediately after the header:
- Target address of your startup code (where it loads in DRAM).
- Length of your startup code in bytes.
Your startup code follows those two longwords. The CD Boot ROM loads a maximum of 64K of code to the target address and transfers 68000 control to its start. The boot track may contain more than 64K of data, but loading the rest is your responsibility.
When control reaches your code, the CD_getoc result is
already in memory at $2C00 — do not call CD_getoc again. Parse that
TOC to find the first track of Session #1 and offset from there.
Track layout diagram
Partition markers
A partition marker is a 64-byte block of 16 repetitions of the same longword, long-aligned relative to the start of the track. They tag the start of data blocks so the read logic (and Atari’s authentication) can locate data despite the inexact read behavior.
- The track header/tailer
ATRIblocks are themselves markers. - Do not use
ATRI,0x00000000, or0xFFFFFFFFas a partition-marker longword. - Break tracks larger than 1 MB with markers so one occurs roughly every 128 KB–1 MB. This keeps authentication fast (worst-case authentication delay ≥ the time to read the data between the two widest-spaced headers).
How markers are used at read time:
CD_readwithCD_init/CD_initf: you start 6 frames early and search the first 31 frames (72,912 bytes) for your marker yourself.- With
CD_initm: the BIOS scans for the marker longword inD1and auto-locates the following data in memory.
Red Book audio
Titles may use Red Book audio as in-game music:
- Normally place it on Session #0 so it plays in an ordinary CD player.
- “Secret” game audio may go on later sessions so the game can gate access (e.g. until level completion). Audio after Session #0 will not play on a standard audio CD player.
- If your title needs little CD access once loaded, you can offer the user the option to insert another Red Book audio disc for playback — see Accessing additional discs.
See also
- CD-ROM Subsystem Overview
- CD-ROM BIOS API —
CD_read,CD_getoc,CD_initm - Programming Procedures & Guidelines
◀ Prev: CD-ROM BIOS API · 🏠 Home · Next: CD-ROM Programming Procedures & Guidelines ▶
Jump to: Architecture · Memory Map · Registers · Instructions · Glossary · CD-ROM